
Tell me this doesn’t make your taste buds yearn.
How this amazing breakfast/dessert item has eluded me all of these years is beyond my comprehension. Apparently the Dutch Baby has been pleasing the breakfast enthusiast for a long time. I know its been a while since I have posted a recipe up here due my own personal laziness, but I promise my friends it was well worth the wait. About a month ago Heather told me about this giant oversize pancake she used to eat when she lived in Portland called a Dutch Baby. After doing some research on the subject I just had to have one. This past Sunday was the day.
I woke up and was craving a Dutch Baby. I was lacking a medium size cast iron pan. Immediately I went on thrift store lurk. Two thrift shops later and a debate on whether this some what fly pair of chocolate loafers looked good on me and was worth $10 (it wasn’t), I found my pot and was ready to go. This thing blew my mind and I am sure it will yours as well. Cook it up for your peers and they will no doubt be giving you praise. The best part is it is fairly easy and cheap to make too.
Total Cost: $9
Feeds 2-4 people
Ingredient List:
- Butter – 3 Table Spoons
- Eggs – 3 (large)
- Milk – 3/4 Cup (Whole)
- Flour – 1/2 Cup (All Purpose)
- Sugar – 1/3 Cup
- Vanilla Extract – 1 Tea Spoon
- Cinnamon – pinch
- Salt – pinch
- Pepper – 1/2 Tea Spoon
- Confectionery Sugar – Table Spoon
- Lemon Juice – Table Spoon
- Medium Size Cast Iron Skillet (8-10 inch)
Step 1: Preheat Oven – Preheat Oven to 425 Degrees F and at the same time on a medium flame melt 2 table spoons of butter in a medium size cast iron skillet (8-10 inch) If you do not have a cast iron skillet you can use an 8-10 inch baking pan or sautoir pan. If you use the sautoir pan be sure to make sure it does not have a plastic handle or it will melt in the oven.

The pan with 2tbs of melted butter
Step 2: Make the Batter – Combine milk, eggs, flour, sugar, cinnamon, salt, pepper, and vanilla extract in a large bowl preferably with an electric mixer. Beat till foamy. Pour finished batter into skillet with the melted butter and place into preheated oven (425F) for around 20 minutes or until Dutch Baby has risen to it’s maximum height and has browned up.

Your batter should be rather runny looking
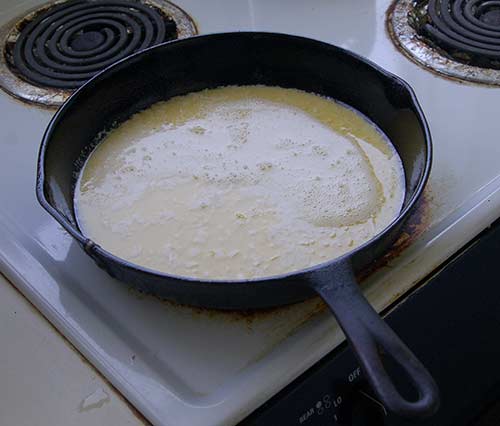
Notice the layer of foam settling at the top of the finished batter.
Step 3: Serve – After 20 minutes or so pull out your finished Dutch Baby. It should have risen rather high and the peaks should have a brown caramelized appearance. The Baby will fall rather quickly so don’t be alarmed. Slice up the remaining table spoon of butter and spread it over the top. Squeeze some lemon juice over the top. Cover with confectionery sugar. Fruit topping is optional, add to your own taste.

Your finished Dutch Baby fresh out of the oven sans topping.

Your final product ready to eat…YUM


